tag page

Introduction

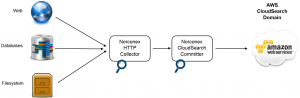
Docker is popular because it makes it easy to package and deliver programs. This article will show you how to run the Java-based, open-source crawler, Norconex HTTP Collector and Elasticsearch Committer in Docker to crawl a website and index its content into Elasticsearch. At the end of this article, you can find links to download the complete, fully functional files.

Overview

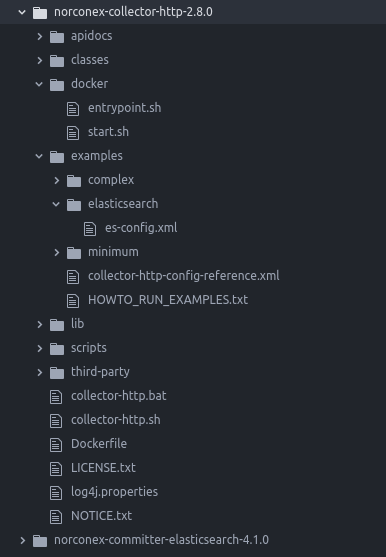
Here is the whole structure, which contains a “Dockerfile” to make a Docker image, “entrypoint.sh” and “start.sh” in “bin/” directory to configure and execute the Docker container, and “es-config.xml” in “examples/elasticsearch” as Norconex-Collector’s configuration file to crawl a website and index contents into Elasticsearch.

Installation

We are using Docker Community Edition in this tutorial. See Install Docker for more information.

Download the latest Norconex Collector and extract the downloaded .zip file. See Getting Started for more details.

Download the latest Norconex Elasticsearch Committer and install it. See Installation for more details.

Collector Configuration

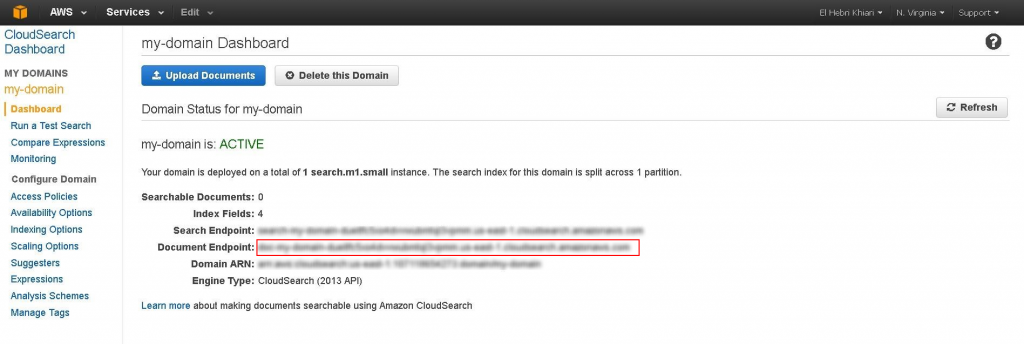
Create “es-config.xml” in the “examples/elasticsearch” directory. In this tutorial, we will crawl /product/collector-http-test/complex1.php and /product/collector-http-test/complex2.php  and index them to Elasticsearch, which is running on 127.0.0.1:9200, with an index named “norconex.” See Norconex Collector Configuration as a reference.

<?xml version="1.0" encoding="UTF-8"?>
<!--
   Copyright 2010-2017 Norconex Inc.

   Licensed under the Apache License, Version 2.0 (the "License");
   you may not use this file except in compliance with the License.
   You may obtain a copy of the License at

       http://www.apache.org/licenses/LICENSE-2.0

   Unless required by applicable law or agreed to in writing, software
   distributed under the License is distributed on an "AS IS" BASIS,
   WITHOUT WARRANTIES OR CONDITIONS OF ANY KIND, either express or implied.
   See the License for the specific language governing permissions and
   limitations under the License.
-->
<httpcollector id="Norconex Complex Collector">

  #set($http = "com.norconex.collector.http")
  #set($core = "com.norconex.collector.core")
  #set($urlNormalizer   = "${http}.url.impl.GenericURLNormalizer")
  #set($filterExtension = "${core}.filter.impl.ExtensionReferenceFilter")
  #set($filterRegexRef  = "${core}.filter.impl.RegexReferenceFilter")
  #set($committerClass = "com.norconex.committer.elasticsearch.ElasticsearchCommitter")
  #set($searchUrl = "http://127.0.0.1:9200")

  <progressDir>../crawlers/norconex/progress</progressDir>
  <logsDir>../crawlers/norconex/logs</logsDir>

  <crawlerDefaults>
    <referenceFilters>
      <filter class="$filterExtension" onMatch="exclude">jpg,gif,png,ico,css,js</filter>
    </referenceFilters>
    <urlNormalizer class="$urlNormalizer">
      <normalizations>
        removeFragment, lowerCaseSchemeHost, upperCaseEscapeSequence,
        decodeUnreservedCharacters, removeDefaultPort, encodeNonURICharacters,
        removeDotSegments
      </normalizations>
    </urlNormalizer>
    <maxDepth>0</maxDepth>
    <workDir>../crawlers/norconex/workDir</workDir>
    <!-- We know we don't want to crawl the entire site, so ignore sitemap. -->
    <sitemapResolverFactory ignore="true" />
  </crawlerDefaults>
  <crawlers>
    <crawler id="Norconex Complex Test Page 1">
      <startURLs>
        <url>/product/collector-http-test/complex1.php</url>
      </startURLs>
      <committer class="$committerClass">
    	  		<nodes>$searchUrl</nodes>
    	  		<indexName>norconex</indexName>
            <typeName>web</typeName>
    	  		<queueDir>../crawlers/norconex/committer-queue</queueDir>
    	  		<targetContentField>body</targetContentField>
    	  		<queueSize>100</queueSize>
  			<commitBatchSize>500</commitBatchSize>
   		</committer>
    </crawler>
    <crawler id="Norconex Complex Test Page 2">
      <startURLs>
        <url>/product/collector-http-test/complex2.php</url>
      </startURLs>
      <committer class="$committerClass">
    	  		<nodes>$searchUrl</nodes>
    	  		<indexName>norconex</indexName>
            <typeName>web</typeName>
    	  		<queueDir>../crawlers/norconex/committer-queue</queueDir>
    	  		<targetContentField>body</targetContentField>
    	  		<queueSize>100</queueSize>
  			<commitBatchSize>500</commitBatchSize>
   		</committer>
    </crawler>
  </crawlers>
</httpcollector>

Entrypoint and Start Scripts

Create a directory, “docker”, to store the configuration and execute scripts.

Entrypoint.sh:

#!/bin/sh
set -x
set -e

set -- /docker/crawler/docker/start.sh "$@"

exec "$@"

start.sh:

#!/bin/sh
set -x
set -e
${CRAWLER_HOME}/collector-http.sh -a start -c examples/elasticsearch/es-config.xml

Dockerfile

A Dockerfile is a simple text -file that contains a list of commands that the Docker client calls on while creating an image. Create a new file, “Dockerfile”, in the “norconex-collector-http-2.8.0” directory.
Let’s start with the base image “java:8-jdk” using FROM keyword.

FROM java:8-jdk

Set environment variables and create a user and group in the image. We’ll set DOCKER_HOME and CRAWLER_HOME environment variables and create the user and group, “crawler”.

ENV DOCKER_HOME /docker
ENV CRAWLER_HOME /docker/crawler
RUN groupadd crawler && useradd -g crawler crawler

The following commands will create DOCKER_HOME and CRAWLER_HOME directories in the container and copy the content from the “norconex-collector-http-2.8.0” directory into CRAWLER_HOME.

RUN mkdir -p ${DOCKER_HOME}
RUN mkdir -p ${CRAWLER_HOME}
COPY ./ ${CRAWLER_HOME}

The following commands change ownership and permissions for DOCKER_HOME, set entrypoint, and execute the crawler.

RUN chown -R crawler:crawler ${DOCKER_HOME} && chmod -R 755 ${DOCKER_HOME}
ENTRYPOINT [ "/docker/crawler/docker/entrypoint.sh" ]
CMD [ "/docker/crawler/docker/start.sh" ]

Almost There

Build a Docker image of Norconex Collector with the following command:

$ docker build -t norconex-collector:2.8.0 .

You will see this success message:

Successfully built 43298c7de13f
Successfully tagged norconex-collector:2.8.0

Start Elasticsearch for development with the following command (see Install Elasticsearch with Docker for more details):

$ docker run -p 9200:9200 -p 9300:9300 -e "discovery.type=single-node" docker.elastic.co/elasticsearch/elasticsearch:6.1.2

Start Norconex Collector.

$ docker run --net=host norconex-collector:2.8.0

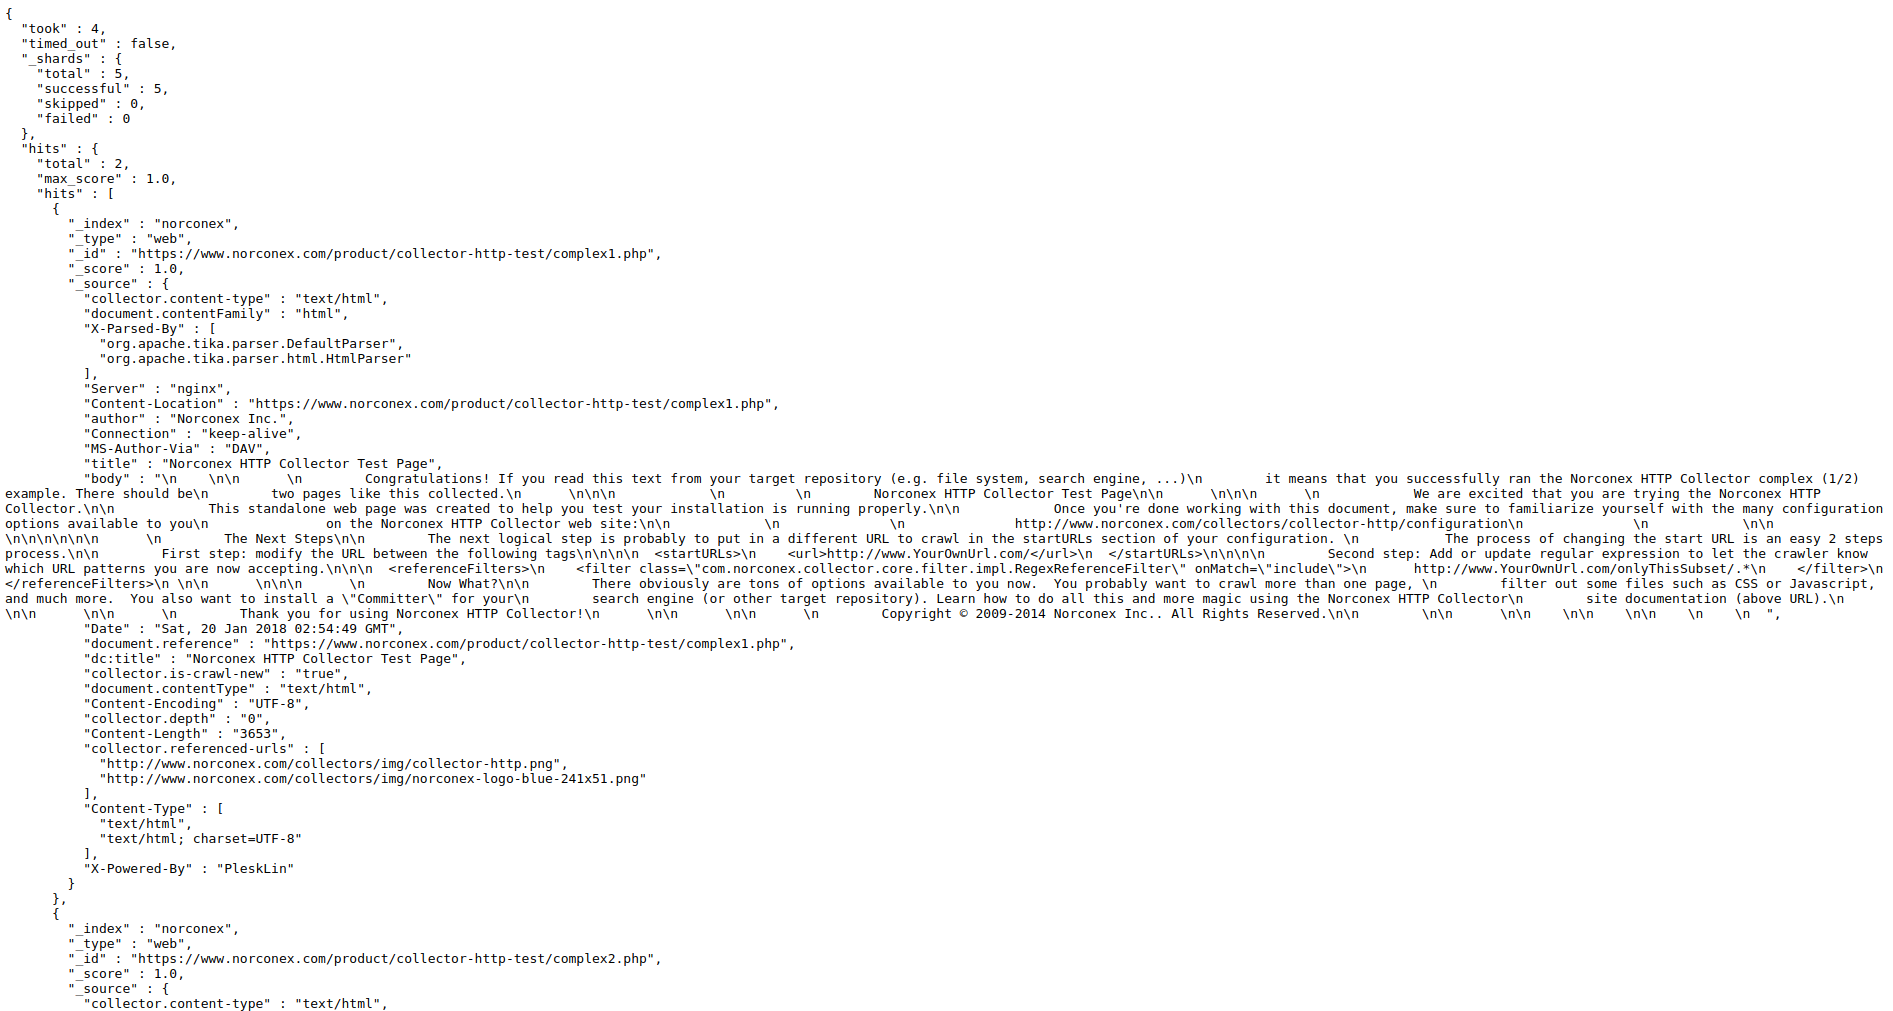
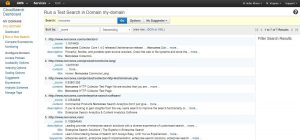
Let’s verify the crawling result. Visit http://127.0.0.1:9200/norconex/_search?pretty=true&q=* and you will see two indexed documents.

Conclusion

This tutorial is for development or testing use. If you would like to use it in a production environment, then we recommend that you consider the data persistence of Elasticsearch Docker container, security, and so forth, based on your particular case.

Useful Links

Download Norconex Collector
Download Norconex Elasticsearch Committer

Norconex is proud to announce the release of Norconex HTTP Collector version 2.8.0.  This release is accompanied by new releases of many related Norconex open-source products (Filesystem Collector, Importer, Committers, etc.), and together they bring dozens of new features and enhancements highlighted below.


Extract a “Featured Image” from web pages

[ezcol_1half]

In addition to taking screenshots of webpages, you can now extract the main image of a web page thanks to the new FeaturedImageProcessor. You can specify conditions to identify the image (first one encountered matching a minimum site or a given pattern). You also have the option to store the image on file or as a BASE64 string with the crawled document (after scaling it to your preferred dimensions) or simply store a reference to it.

[/ezcol_1half]

[ezcol_1half_end]

<preImportProcessors>
  <processor class="com.norconex.collector.http.processor.impl.FeaturedImageProcessor">
    <minDimensions>300x400</minDimensions>
    <scaleDimensions>50</scaleDimensions>
    <imageFormat>jpg</imageFormat>
    <scaleQuality>max</scaleQuality>  	
    <storage>inline</storage>
  </processor>
</preImportProcessors>

[/ezcol_1half_end]

Limit link extraction to specific page portions

[ezcol_1half]

The GenericLinkExtractor now makes it possible to only extract links to be followed found within one or more specific sections of a web page. For instance, you may want to only extract links found in navigation menus and not those found in content areas in case the links usually point to other sites you do not want to crawl.

[/ezcol_1half]

[ezcol_1half_end]

<extractor class="com.norconex.collector.http.url.impl.GenericLinkExtractor">
 
  <extractBetween>
    <start><![CDATA[<!-- BEGIN NAV LINKS -->]]></start>
    <end><![CDATA[<!-- END NAV LINKS -->]]></end>
  </extractBetween>
 
  <noExtractBetween>
    <start><![CDATA[<!-- BEGIN EXTERNAL SITES -->]]></start>
    <end><![CDATA[<!-- END EXTERNAL SITES -->]]></end>
  </noExtractBetween>
 
</extractor>

[/ezcol_1half_end]

Truncate long field values

[ezcol_1half]

The new TruncateTagger offers the ability to truncate long values and the option to replace the truncated portion with a hash to help preserve uniqueness when required. This is especially useful in preventing errors with search engines (or other repositories) and field length limitations.

[/ezcol_1half]

[ezcol_1half_end]

<tagger class="com.norconex.importer.handler.tagger.impl.TruncateTagger"
    fromField="mySuperLongField"
    maxLength="500"
    toField="myTruncatedField"
    overwrite="true"
    appendHash="true"
    suffix="!" />

[/ezcol_1half_end]

Add metadata to a document using an external application

[ezcol_1half]

The new ExternalTagger allows you to point to an external (i.e., command-line) application to “decorate” a document with extra metadata information. Both the existing document content and metadata can be supplied to the external application. The application output can be in a specific format (json, xml, properties) or free-form combined with metadata extraction patterns you can configure. Either standard streams or files can be supplied as arguments to the external application. To transform the content using an external application instead, have a look at the ExternalTranformer, which has also been updated to support metadata.

[/ezcol_1half]

[ezcol_1half_end]

<tagger class="com.norconex.importer.handler.tagger.impl.ExternalTagger">
  <command>
    /app/addressExtractor ${INPUT} ${INPUT_META} ${REFERENCE}
  </command>
  <metadata inputFormat="json">
    <pattern field="address" valueGroup="1">
      ^address=(.*)$
    </pattern>
  </metadata>
</tagger>

[/ezcol_1half_end]

Other improvements

This release includes many more new features and enhancements:

  • To create a document checksum, you can now combine metadata with content.
  • The TextPatternTagger can now extract field names dynamically in addition to values.
  • The ReplaceTagger and ReplaceTransformer now support empty/null replacement values.
  • There are new configuration options on the GenericHttpClientFactory:
    • “authFormParams” to add arbitrary parameters to authentication forms.
    • “authPreemptive” to use preemptive authentication with BASIC authentication.
  • The Amazon CloudSearch and Elasticsearch Committers both have a new “fixBadIds” flag to safely handle URLs that do not meet product limitations.

For the complete list of changes, refer to these product release notes:

Useful links

Norconex released an SQL Committer for its open-source crawlers (Norconex Collectors).  This enables you to store your crawled information into an SQL database of your choice.

To define an SQL database as your crawler’s target repository, follow these steps:

  1. Download the SQL Search Committer.
  2. Follow the install instructions.
  3. Add this minimalist configuration snippet to your Collector configuration file. It is using H2 database as an example only. Replace with your own settings:
    <committer class="com.norconex.committer.sql.SQLCommitter">
      <driverPath>/path/to/driver/h2.jar</driverPath>
      <driverClass>org.h2.Driver</driverClass>
      <connectionUrl>jdbc:h2:file:///path/to/db/h2</connectionUrl>
      <tableName>test_table</tableName>
      <createMissing>true</createMissing>
    </committer>
  4. Get familiar with additional Committer configuration options.  For instance, while the above example will create a table and fields for you, you can also use an existing table, or provide the CREATE statement used to create a table.

For further information:

Norconex just released a Microsoft Azure Search Committer for its open-source crawlers (Norconex Collectors).  This empowers Azure Search users with full-featured file system and web crawlers.

If you have not yet discovered Norconex Collectors, head over to the Norconex Collectors website to see what you’ve been missing.

To enable Azure Search as your crawler’s target search engine, follow these steps:

  1. Download the Azure Search Committer.
  2. Follow the install instructions.
  3. Add this minimum required configuration snippet to your Collector configuration file:
    <committer class="com.norconex.committer.azuresearch.AzureSearchCommitter">
      <endpoint>https://example.search.windows.net</endpoint>
      <apiKey>1234567890ABCDEF1234567890ABCDEF</apiKey>
      <indexName>sample-index</indexName>
    </committer>
  4. You need to configure your index schema, the endpoint and index name from your Azure Search dashboard.  You will also obtain the admin API key from Azure Search Service dashboard.

The complete list of Committer configuration options is available here.  You will need to make sure the fields crawled match those you defined in your Azure Search index (can be achieved from your Collector configuration).

For further information:

Amazon Web Services (AWS) have been all the rage lately, used by many organizations, companies and even individuals. This rise in popularity can be attributed to the sheer number of services provided by AWS, such as Elastic Compute (EC2), Elastic Beanstalk, Amazon S3, DynamoDB and so on. One particular service that has been getting more exposure very recently is the Amazon CloudSearch service. It is a platform that is built on top of the Apache Solr search engine and enables the indexing and searching of documents with a multitude of features.
The main focus of this blog post is crawling and indexing sites. Before delving into that, however, I will briefly go over the steps to configure a simple AWS CloudSearch domain. If you’re already familiar with creating a domain, you may skip to the next section of the post.


Starting a Domain

A CloudSearch domain is the search instance where all your documents will be indexed and stored. The level of usage of these domains is what dictates the pricing. Visit this link for more details.
Luckily, the web interface is visually appealing, intuitive and user friendly. First of all, you need an AWS account. If you don’t have one already, you can create one now by visiting the Amazon website. Once you have an account, simply follow these steps:

1) Click the CloudSearch icon (under the Analytics section) in the AWS console.

2) Click the “Create new search domain” button. Give the domain a name that conforms to the rules given in the first line of the popup menu, and select the instance type and replication factor you want. I’ll go for the default options to keep it simple.

3) Choose how you want your index fields to be added. I recommend starting off with the manual configuration option because it gives you the choice of adding the index fields at any time. You can find the description of each index field type here:

4) Set the access policies of your domain. You can start with the first option because it is the most straightforward and sensible way to start.

5) Review your selected options and edit what needs to be edited. Once you’re satisfied with the configurations, click “Confirm” to finalize the process.


It’ll take a few minutes for the domain to be ready for use, as indicated by the yellow “LOADING” label that shows up next to the domain name. A green “ACTIVE” label shows up once the loading is done.

Now that the domain is fully loaded and ready to be used, you can choose to upload documents to it, add index fields, add suggesters, add analysis schemes and so on. Note, however, that the domain will need to be re-indexed for every change that you apply. This can be done by clicking the “Run indexing” button that pops up with every change. The time it takes for the re-indexing to finish depends on the number of documents contained in the domain.

As mentioned previously, the main focus of this post is crawling sites and indexing the data to a CloudSearch domain. At the time of this writing, there are very few crawlers that are able to commit to a CloudSearch domain, and the ones that do are unintuitive and needlessly complicated. The Norconex HTTP Collector is the only crawler that has CloudSearch support that is very intuitive and straightforward. The remainder of this blog post aims to guide you through the steps necessary to set up a crawler and index the data to a CloudSearch domain in as simple and informative steps as possible.


Setting up the Norconex HTTP Collector

The Norconex HTTP Collector will be installed and configured in a Linux environment using Unix syntax. You can still, however, install on Windows, and the instructions are just as simple.

Unzip the downloaded file and navigate to the extracted folder. If needed, make sure to set the directory as readable and writable using the chmod command. Once that’s done, follow these steps:

1) Create a directory and name it testCrawl. In the folder myCrawler, create a file config.xml and populate it with the minimal configuration file, which you can find in the examples/minimum directory.

2) Give the crawler a name in the <httpcollector id="..."> I’ll name my crawler TestCrawl.

3) Set progress and log directories in their respective tags:

<progressDir>./testCrawl/progressdir</progressDir>
<logsDir>./testCrawl/logsDir</logsDir>


4) Within <crawlerDefaults>, set the work directory where the files will be stored during the crawling process:

<workDir>./testCrawl/workDir</workDir>

5) Type the site you want crawled in the [tag name] tag:

<url>http://beta2.norconex.com/</url>

Another method is to create a file with a list of URLs you want crawled, and point to the file:

<urlsFile>./urls/urlFile</urlsFile>

6) If needed, set a limit on how deep (from the start URL) the crawler can go and a limit on the number of documents to process:

<maxDepth>2</maxDepth>
<maxDocuments>10</maxDocuments>

7) If needed, you can set the crawler to ignore documents with specific file extensions. This is done by using the ExtensionReferenceFilter class as follows:

<referenceFilters>
  	<filter
     	class="com.norconex.collector.core.filter.impl.ExtensionReferenceFilter"                                                                             
            onMatch="exclude" caseSensitive="false">
         	png,gif,jpg,jpeg,js,css
  	</filter>
</referenceFilters>

8) You will most likely want to use an importer to parse the crawled data before it’s sent to your CloudSearch domain. The Norconex importer is a very intuitive and easy-to-use tool with a plethora of different configuration options, offering a multitude of pre- and post-parse taggers, transforms, filters and splitters, all of which can be found here. As a starting point, you may want to use the KeepOnlyTagger as a post-parse handler, where you get to decide on what metadata fields to keep:

<importer>
      <postParseHandlers>
         <tagger class="com.norconex.importer.handler.tagger.impl.KeepOnlyTagger">
            <fields>title,description</fields>
         </tagger>
       </postParseHandlers>
</importer>

Be sure that your CloudSearch domain has been configured to support the metadata fields described above. Also, make sure to have a ‘content’ field in your CloudSearch domain as the committer assumes that there’s one.

The config.xml file should look something like this:

<?xml version="1.0" encoding="UTF-8"?>
<!-- 
   Copyright 2010-2015 Norconex Inc.

   Licensed under the Apache License, Version 2.0 (the "License");
   you may not use this file except in compliance with the License.
   You may obtain a copy of the License at

       http://www.apache.org/licenses/LICENSE-2.0

   Unless required by applicable law or agreed to in writing, software
   distributed under the License is distributed on an "AS IS" BASIS,
   WITHOUT WARRANTIES OR CONDITIONS OF ANY KIND, either express or implied.
   See the License for the specific language governing permissions and
   limitations under the License.
-->
<!-- This configuration shows the minimum required and basic recommendations
     to run a crawler.  
     -->
<httpcollector id="TestCrawl">

  <!-- Decide where to store generated files. -->
  <progressDir>../myCrawler/testCrawl/progress</progressDir>
  <logsDir>../myCrawler/testCrawl/logs</logsDir>

  <crawlers>
    <crawler id="CloudSearch">

      <!-- Requires at least one start URL (or urlsFile). 
           Optionally limit crawling to same protocol/domain/port as 
           start URLs. -->
      <startURLs stayOnDomain="true" stayOnPort="true" stayOnProtocol="true">
        <url>http://beta2.norconex.com/</url>
      </startURLs>

      <!-- === Recommendations: ============================================ -->

      <!-- Specify a crawler default directory where to generate files. -->
      <workDir>../myCrawler/testCrawl</workDir>

      <!-- Put a maximum depth to avoid infinite crawling (e.g. calendars). -->
      <maxDepth>2</maxDepth>
      <maxDocuments>10</maxDocuments>

      <!-- We know we don't want to crawl the entire site, so ignore sitemap. -->
      <!-- Before 2.3.0: -->
      <sitemap ignore="true" />
      <!-- Since 2.3.0: -->
      <sitemapResolverFactory ignore="true" />

      <!-- Be as nice as you can to sites you crawl. -->
      <delay default="5000" />

	  
      <referenceFilters>
      	<filter class="$filterExtension" 
			onMatch="exclude"
			caseSensitive="false" >
			png,gif,jpg,jpeg,js,css
		</filter>
      </referenceFilters>

      
      <!-- Document importing -->
 
      <importer>
        <postParseHandlers>
          <tagger class="com.norconex.importer.handler.tagger.impl.KeepOnlyTagger">
            <fields>title,description/fields>
          </tagger>
        </postParseHandlers>
      </importer> 

 	</crawler>
  </crawlers> 
</httpcollector>


The Norconex CloudSearch Committer

The Norconex http collector is compatible with several committers such as Solr, Lucidworks, Elasticsearch, etc. Visit this website to find out what other committers are available. The latest addition to this set of committers is the AWS CloudSearch committer. This is an especially useful committer since the very few publicly available CloudSearch committers are needlessly complicated and unintuitive. Luckily for you, Norconex solves this issue by offering a very simple and straightforward CloudSearch committer. All you have to do is:

1) Download the JAR file from here, and move it to the lib folder of the http collector folder.

2) Add the following towards the end of the <craweler></crawler> block (right after the specifying the importer) in your config.xml file:

<committer class="com.norconex.committer.cloudsearch.CloudSearchCommitter">
    <documentEndpoint></documentEndpoint>
    <accessKey></accessKey>
    <secretAccessKey></secretAccessKey>
</committer>

You can obtain the URL for your document endpoint from your CloudSearch domain’s main page. As for the AWS credentials, specifying them in the config file could result in an error due to a bug in the committer. Therefore, we strongly recommend that you DO NOT include the <accessKey> and <secretAccessKey> variables. Instead, we recommend that you set two environment variables, AWS_ACCESS_KEY and AWS_SECRET_ACCESS_KEY with their respective values. To obtain and use these values, refer to the AWS documentation.


Run the Crawler!

All that is left to do is to run the http collector using the Linux shell script (from the main collector directory):

./collector-http.sh -a start -c ./myCrawler/config.xml

Give the crawler some time to crawl the specified URLs, until it reaches the <maxDepth> or <maxDocuments> constraints, or if it finds no more URLs to crawl. Once the crawling is complete, the successfully processed documents will be committed to the domain specified in the <documentEndpoint> option.

To confirm that the documents have indeed been uploaded, you can go to the domain’s main page and see how many documents are stored and run a test search.

Norconex released version 2.7.0 of both its HTTP Collector and Filesystem Collector.  This update, along with related component updates, introduces several interesting features.

HTTP Collector changes

The following items are specific to the HTTP Collector.  For changes applying to both the HTTP Collector and the Filesystem Collector, you can proceed to the “Generic changes” section.

Crawling of JavaScript-driven pages

[ezcol_1half]

The alternative document fetcher PhantomJSDocumentFetcher now makes it possible to crawl web pages with JavaScript-generated content. This much awaited feature is now available thanks to integration with the open-source PhantomJS headless browser.   As a bonus, you can also take screenshots of web pages you crawl.

[/ezcol_1half]

[ezcol_1half_end]

<documentFetcher 
    class="com.norconex.collector.http.fetch.impl.PhantomJSDocumentFetcher">
  <exePath>/path/to/phantomjs.exe</exePath>
  <renderWaitTime>5000</renderWaitTime>
  <referencePattern>^.*\.html$</referencePattern> 
</documentFetcher>

[/ezcol_1half_end]

More ways to extract links

[ezcol_1half]

This release introduces two new link extractors.  You can now use the XMLFeedLinkExtractor to extract links from RSS or Atom feeds. For maximum flexibility, the RegexLinkExtractor can be used to extract links using regular expressions.

[/ezcol_1half]

[ezcol_1half_end]

<extractor class="com.norconex.collector.http.url.impl.RegexLinkExtractor">
  <linkExtractionPatterns>
    <pattern group="1">\[(http.*?)\]</pattern>
  </linkExtractionPatterns>
</extractor>
<extractor class="com.norconex.collector.http.url.impl.XMLFeedLinkExtractor">
  <applyToReferencePattern>.*rss$</applyToReferencePattern>
</extractor>

[/ezcol_1half_end]

Generic changes

The following changes apply to both Filesystem and HTTP Collectors. Most of these changes come from an update to the Norconex Importer module (now also at version 2.7.0).

Much improved XML configuration validation

[ezcol_1half]

You no longer have to hunt for a misconfiguration.  Schema-based XML configuration validation was added and you will now get errors if you have a bad XML syntax for any configuration options.   This validation can be trigged on command prompt with this new flag: -k or --checkcfg.

[/ezcol_1half]

[ezcol_1half_end]

# -k can be used on its own, but when combined with -a (like below),
# it will prevent the collector from executing if there are any errors.

collector-http.sh -a start -c examples/minimum/minimum-config.xml -k

# Error sample:
ERROR (XML) ReplaceTagger: cvc-attribute.3: The value 'asdf' of attribute 'regex' on element 'replace' is not valid with respect to its type, 'boolean'.

[/ezcol_1half_end]

Enter durations in human-readable format

[ezcol_1half]

Having to convert a duration in milliseconds is not the most friendly. Anywhere in your XML configuration where a duration is expected, you can now use a human-readable representation (English only) as an alternative.

[/ezcol_1half]

[ezcol_1half_end]

<!-- Example using "5 seconds" and "1 second" as opposed to milliseconds -->
<delay class="com.norconex.collector.http.delay.impl.GenericDelayResolver"
    default="5 seconds" ignoreRobotsCrawlDelay="true" scope="site" >
  <schedule dayOfWeek="from Saturday to Sunday">1 second</schedule>
</delay>

[/ezcol_1half_end]

Lua scripting language

[ezcol_1half]

Support for Lua scripting has been added to ScriptFilter, ScriptTagger, and ScriptTransformer.  This gives you one more scripting option available out-of-the-box besides JavaScript/ECMAScript.

[/ezcol_1half]

[ezcol_1half_end]

<!-- Add "apple" to a "fruit" metadata field: -->
<tagger class="com.norconex.importer.handler.tagger.impl.ScriptTagger"
    engineName="lua">
  <script><![CDATA[
    metadata:addString('fruit', {'apple'});
  ]]></script>
</tagger>

[/ezcol_1half_end]

Modify documents using an external application

[ezcol_1half]

With the new ExternalTransformer, you can now use an external application to perform document transformation.  This is an alternative to the existing ExternalParser, which was enhanced to provide the same environment variables and metadata extraction support as the ExternalTransformer.

[/ezcol_1half]

[ezcol_1half_end]

<transformer class="com.norconex.importer.handler.transformer.impl.ExternalTransformer">
  <command>/path/transform/app ${INPUT} ${OUTPUT}</command>
  <metadata>
    <match field="docnumber">DocNo:(\d+)</match>
  </metadata>
</transformer>

[/ezcol_1half_end]

Combine document fields

[ezcol_1half]

The new MergeTagger can be used for combining multiple fields into one. The target field can be either multi-value or single-value separated with the character of your choice.

[/ezcol_1half]

[ezcol_1half_end]

<tagger class="com.norconex.importer.handler.tagger.impl.MergeTagger">
  <merge toField="title" deleteFromFields="true" 
      singleValue="true" singleValueSeparator=",">
    <fromFields>title,dc.title,dc:title,doctitle</fromFields>
  </merge>
</tagger>

[/ezcol_1half_end]

New Committers

[ezcol_1half]

Whether you do not have a target repository (Solr, Elasticsearch, etc) ready at the time of crawling, or whether you are not using a repository at all, Norconex Collectors now ships with two file-based Committers for easy consumption by your own process: XMLFileCommitter and JSONFileCommitter. All available committers can be found here.

[/ezcol_1half]

[ezcol_1half_end]

<committer class="com.norconex.committer.core.impl.XMLFileCommitter">
 <directory>/path/my-xmls/</directory>
 <pretty>true</pretty>
 <docsPerFile>100</docsPerFile>
 <compress>false</compress>
 <splitAddDelete>false</splitAddDelete>
</committer>

[/ezcol_1half_end]

More

Several additional features or changes can be found in the latest Collector releases.  Among them:

  • New Importer RegexReferenceFilter for filtering documents based on matching references (e.g. URL).
  • New SubstringTransformer for truncating content.
  • New UUIDTagger for giving a unique id to each documents.
  • CharacterCaseTagger now supports “swap” and “string” to swap character case and capitalize beginning of a string, respectively.
  • ConstantTagger offers options when dealing with existing values: add to existing values, replace them, or do nothing.
  • Components such as Importer, Committers, etc., are all easier to install thanks to new utility scripts.
  • Document Access-Control-List (ACL) information is now extracted from SMB/CIFS file systems (Filesytem Collector).
  • New ICollectorLifeCycleListener interface that can be added on the collector configuration to be notified and take action when the collector starts and stops.
  • Added “removeTrailingHash” as a new GenericURLNormalizer option (HTTP Collector).
  • New “detectContentType” and “detectCharset” options on GenericDocumentFetcher for ignoring the content type and character encoding obtained from the HTTP response headers and detect them instead (Filesytem Collector).
  • Start URLs and start paths can now be dynamically created thanks to IStartURLsProvider and IStartPathsProvider (HTTP Collector and Filesystem Collector).

To get the complete list of changes, refer to the HTTP Collector release notes, Filesystem Collector release notes, or the release notes of dependent Norconex libraries such as: Importer release notes and Collector Core release notes.

Download

Looking for InformationThere are many business applications where web crawling can be of benefit. You or your team likely have ongoing research projects or smaller projects that come up from time to time. You may do a lot of manual web searching (think Google) looking for random information, but what if you need to do targeted reviews to pull specific data from numerous websites? A manual web search can be time consuming and prone to human error, and some important information could be overlooked. An application powered by a custom crawler can be an invaluable tool to save the manpower required to extract relevant content. This can allow you more time to actually review and analyze the data, putting it to work for your business.

A web crawler can be set up to locate and gather complete or partial content from public websites, and the information can be provided to you in an easily manageable format. The data can be stored in a search engine or database, integrated with an in-house system or tailored to any other target. There are multiple ways to access the data you gathered. It can be as simple as receiving a scheduled e-mail message with a .csv file or setting up search pages or a web app. You can also add functionality to sort the content, such as pulling data from a specific timeframe, by certain keywords or whatever you need.
If you have developers in house and want to build your own solution, you don’t even have to start from scratch. There are many tools available to get you started, such as our free crawler:  Norconex HTTP Collector

If you hire a company to build your web crawler, you will want to use a reputable company that will respect all website terms of use. The solution can be set up and then “handed over” to your organization for you to run on an ongoing basis. For a hosted solution, the crawler and any associated applications will be set up and managed for you. This means any changes to your needs like adding/removing what sites to monitor or changing the parameters of what information you want to extract can be managed and supported as needed with minimal effort by your team.

Here are some examples of how businesses might use web crawling:

MONITORING THE NEWS AND SOCIAL MEDIA

What is being said about your organization in the media? Do you review industry forums? Are there comments posted on external sites by your customers that you might not even be aware of to which your team should be responding? A web crawler can monitor news sites, social media sites (Facebook, LinkedIn, Twitter, etc.), industry forums and others to get information on what is being said about you and your competitors. This kind of information could be invaluable to your marketing team to keep a pulse on your company image through sentiment analysis. This can help you know more about your customers’ perceptions and how you are comparing against your competition.

COMPETITIVE INFORMATION

Are people on your sales, marketing or product management teams tasked with going online to find out what new products or services are being provided by your competitors? Are you searching the competition to review pricing to make sure you are priced competitively in your space? What about comparing how your competitors are promoting their products to customers? A web crawler can be set up to grab that information, and then it can be provided to you so you can concentrate on analyzing that data rather than finding it. If you’re not currently monitoring your competition in this way, maybe you should be.

LEAD GENERATION

Does your business rely on information from other websites to help you generate a portion of your revenues? If you had better, faster access to that information, what additional revenues might that influence? An example is companies that specialize in staffing and job placement. When they know which companies are hiring, it provides them with an opportunity to reach out to those companies and help them fill those positions. They may wish to crawl the websites of key or target accounts, public job sites, job groups on LinkedIn and Facebook or forums on sites like Quora or Freelance to find all new job postings or details about companies looking for help with various business requirements. Capturing all those leads and returning them in a useable format can help generate more business.

TARGET LISTS

A crawler can be set up to do entity extraction from websites. Say, for example, an automobile association needs to reach out to all car dealerships and manufacturers to promote services or industry events. A crawler can be set up to crawl target websites that provide relevant company listings to pull things like addresses, contact names and phone numbers (if available), and that content can be provided in a single, usable repository.

POSTING ALERTS

Do you have partners whose websites you need to monitor for information in order to grow your business? Think of the real estate or rental agent who is constantly scouring the MLS (Multiple Listing Service) and other realtor listing sites to find that perfect home or commercial property for a client they are serving. A web crawler can be set up to extract and send all new listings matching their requirements from multiple sites directly to their inbox as soon as they are posted to give them a leg up on their competition.

SUPPLIER PRICING AND AVAILABILITY

If you are purchasing product from various suppliers, you are likely going back and forth between their sites to compare offerings, pricing and availability. Being able to compare this information without going from website to website could save your business a lot of time and ensure you don’t miss out on the best deals!

These are just some of the many examples of how web crawling can be of benefit. The number of business cases where web crawlers can be applied are endless. What are yours?


Useful links


HTTP Collector 2.6

Norconex has released version 2.6.0 of its HTTP Collector web crawler! Among new features, an upgrade of its Importer module brings new document parsing and manipulating capabilities. Some of the changes highlighted here also benefit the Norconex Filesystem Collector.

New URL normalization to remove trailing slashes

[ezcol_1half]

The GenericURLNormalizer has a new pre-defined normalization rule: “removeTrailingSlash”. When used, it makes sure to remove forward slash (/) found at the end of URLs so such URLs are treated the same as those not ending with such character. As an example:

  • https://norconex.com/ will become https://norconex.com
  • https://norconex.com/blah/ will become https://norconex.com/blah

It can be used with the 20 other normalization rules offered, and you can still provide your own.

[/ezcol_1half]

[ezcol_1half_end]

<urlNormalizer class="com.norconex.collector.http.url.impl.GenericURLNormalizer">
  <normalizations>
    removeFragment, lowerCaseSchemeHost, upperCaseEscapeSequence,
    decodeUnreservedCharacters, removeDefaultPort,
    encodeNonURICharacters, removeTrailingSlash
  </normalizations>
</urlNormalizer>

[/ezcol_1half_end]

Prevent sitemap detection attempts

[ezcol_1half]

By default StandardSitemapResolverFactory is enabled and tries to detect whether a sitemap file exists at the “/sitemap.xml” or “/sitemap_index.xml” URL path. For websites without sitemaps files at these location, this creates unnecessary HTTP request failures. It is now possible to specify an empty “path” so that such discovery does not take place. In such case, it will rely on sitemap URLs explicitly provided as “start URLs” or sitemaps defined in “robots.txt” files.

[/ezcol_1half]

[ezcol_1half_end]

<sitemapResolverFactory>
  <path/>
</sitemapResolverFactory>

[/ezcol_1half_end]

Count occurrences of matching text

[ezcol_1half]

Thanks to the new CountMatchesTagger, it is now possible to count the number of times any piece of text or regular expression occurs in a document content or one of its fields. A sample use case may be to use the obtained count as a relevancy factor in search engines. For instance, one may use this new feature to find out how many segments are found in a document URL, giving less importance to documents with many segments.

[/ezcol_1half]

[ezcol_1half_end]

<tagger class="com.norconex.importer.handler.tagger.impl.CountMatchesTagger"> 
  <countMatches 
      fromField="document.reference"
      toField="urlSegmentCount" 
      regex="true">
    /[^/]+
  </countMatches>
</tagger>

[/ezcol_1half_end]

Multiple date formats

[ezcol_1half]

DateFormatTagger now accepts multiple source formats when attempting to convert dates from one format to another. This is particularly useful when the date formats found in documents or web pages are not consistent. Some products, such as Apache Solr, usually expect dates to be of a specific format only.

[/ezcol_1half]

[ezcol_1half_end]

<tagger class="com.norconex.importer.handler.tagger.impl.DateFormatTagger"
    fromField="Last-Modified"
    toField="solr_date"
    toFormat="yyyy-MM-dd'T'HH:mm:ss.SSS'Z'">
  <fromFormat>EEE, dd MMM yyyy HH:mm:ss zzz</fromFormat>
  <fromFormat>EPOCH</fromFormat>
</tagger>

[/ezcol_1half_end]

DOM enhancements

[ezcol_1half]

DOM-related features just got better. First, the DOMTagger, which allows one to extract values from an XML/HTML document using a DOM-like structurenow supports an optional “fromField” to read the markup content from a field instead of the document content. It also supports a new “defaultValue” attribute to store a value of your choice when there are no matches with your DOM selector. In addition, now both DOMContentFilter and DOMTagger supports many more selector extraction options: ownText, data, id, tagName, val, className, cssSelector, and attr(attributeKey).

[/ezcol_1half]

[ezcol_1half_end]

<tagger class="com.norconex.importer.handler.tagger.impl.DOMTagger">
  <dom selector="div.contact" toField="htmlContacts" extract="html" />
</tagger>
<tagger class="com.norconex.importer.handler.tagger.impl.DOMTagger"
    fromField="htmlContacts">
  <dom selector="div.firstName" toField="firstNames" 
       extract="ownText" defaultValue="NO_FIRST_NAME" />
  <dom selector="div.lastName"  toField="lastNames" 
       extract="ownText" defaultValue="NO_LAST_NAME" />
</tagger>

[/ezcol_1half_end]

More control of embedded documents parsing

[ezcol_1half]

GenericDocumentParserFactory now allows you to control which embedded documents you do not want extracted from their containing document (e.g., do not extract embedded images). In addition, it also allows you to control which containing document you do not want to extract their embedded documents (e.g., do not extract documents embedded in MS Office documents). Finally, it also allows you now to specify which content types to “split” their embedded documents into separate files (as if they were standalone documents), via regular expression (e.g. documents contained in a zip file).

[/ezcol_1half]

[ezcol_1half_end]

<documentParserFactory class="com.norconex.importer.parser.GenericDocumentParserFactory">
  <embedded>
    <splitContentTypes>application/zip</splitContentTypes>
    <noExtractEmbeddedContentTypes>image/.*</noExtractEmbeddedContentTypes>
    <noExtractContainerContentTypes>
      application/(msword|vnd\.ms-.*|vnd\.openxmlformats-officedocument\..*)
    </noExtractContainerContentTypes>
  </embedded>
</documentParserFactory>

[/ezcol_1half_end]

Document parsers now XML configurable

[ezcol_1half]

GenericDocumentParserFactory now makes it possible to overwrite one or more parsers the Importer module uses by default via regular XML configuration. For any content type, you can specify your custom parser, including an external parser.

[/ezcol_1half]

[ezcol_1half_end]

<documentParserFactory class="com.norconex.importer.parser.GenericDocumentParserFactory">
  <parsers>
    <parser contentType="text/html" 
        class="com.example.MyCustomHTMLParser" />
    <parser contentType="application/pdf" 
        class="com.norconex.importer.parser.impl.ExternalParser">
      <command>java -jar c:\Apps\pdfbox-app-2.0.2.jar ExtractText ${INPUT} ${OUTPUT}</command>
    </parser>
  </parsers>
</documentParserFactory>

[/ezcol_1half_end]

More languages detected

[ezcol_1half]

LanguageTagger now uses Tika language detection, which supports at least 70 languages.

[/ezcol_1half]

[ezcol_1half_end]

<tagger class="com.norconex.importer.handler.tagger.impl.LanguageTagger">
  <languages>en, fr</languages>
</tagger>

[/ezcol_1half_end]

What else?

Other changes and stability improvements were made to this release. A few examples:

  • New “checkcfg” launch action that helps detect configuration issues before an actual launch.
  • Can now specify “notFoundStatusCodes” on GenericMetadataFetcher.
  • GenericLinkExtractor no longer extracts URL from HTML/XML comments by default.
  • URL referrer data is now always preserved by default.

To get the complete list of changes, refer to the HTTP Collector release notes, or the release notes of dependent Norconex libraries such as: Importer release notes and Collector Core release notes.

Useful links

HTTP Collector 2.5

Norconex has released Norconex HTTP Collector version 2.5.0! This new version of our open source web crawler was released to help minimize your re-crawling frequencies and download delays, and it allows you to specify a locale for date parsing/formatting. The following highlights these key changes and additions:

Minimum re-crawl frequency

[ezcol_1half]

Not all web pages and documents are updated as regularly. In addition, updates are not as important to capture right away for all types of content. Re-crawling every page every time to find out if they changed or not can be time consuming (and sometimes taxing) on larger sites. For instance, you may want to re-crawl news pages more regularly than other types of pages on a given site. Luckily, some websites provide sitemaps which give crawlers pointers to its document update frequencies.

This release introduces “recrawlable resolvers” to help control the frequency of document re-crawls. You can now specify a minimum re-crawl delay, based on a document matching content type or reference pattern. The default implementation is GenericRecrawlableResolver, which supports sitemap “lastmod” and “changefreq” in addition to custom re-crawl frequencies.

[/ezcol_1half]

[ezcol_1half_end]

<recrawlableResolver
    class="com.norconex.collector.http.recrawl.impl.GenericRecrawlableResolver"
    sitemapSupport="last" >
  <minFrequency applyTo="contentType" value="monthly">application/pdf</minFrequency>
  <minFrequency applyTo="reference" value="1800000">.*latest-news.*\.html</minFrequency>
</recrawlableResolver>

[/ezcol_1half_end]

Download delays based on document URL

[ezcol_1half]

ReferenceDelayResolver is a new “delay resolver” that controls delays between each document download. It allows you to define different delays for different URL patterns. This can be useful for more fragile websites negatively impacted by the fast download of several big documents (e.g., PDFs). In such cases, introducing a delay between certain types of download can help keep the crawled website performance intact.

[/ezcol_1half]

[ezcol_1half_end]

<delay class="com.norconex.collector.http.delay.impl.ReferenceDelayResolver"
    default="2000"
    ignoreRobotsCrawlDelay="true"
    scope="crawler" >
  <pattern delay="10000">.*\.pdf$</pattern>
</delay>

[/ezcol_1half_end]

Specify a locale in date parsing/formatting

[ezcol_1half]

Thanks to the Norconex Importer 2.5.2 dependency update, it is now possible to specify a locale when parsing/formatting dates with CurrentDateTagger and DateFormatTagger.

[/ezcol_1half]

[ezcol_1half_end]

<tagger class="com.norconex.importer.handler.tagger.impl.DateFormatTagger"
    fromField="date"
    fromFormat="EEE, dd MMM yyyy HH:mm:ss 'GMT'"
    fromLocale="fr"
    toFormat="yyyy-MM-dd'T'HH:mm:ss'Z'"
    keepBadDates="false"
    overwrite="true" />

[/ezcol_1half_end]


Useful links

  • Download Norconex HTTP Collector
  • Get started with Norconex HTTP Collector
  • Report your issues and questions on Github
  • Norconex HTTP Collector Release Notes


Norconex just released an Amazon CloudSearch Committer module for its open-source crawlers (Norconex “Collectors”). This is an especially useful contribution to CloudSearch users given that CloudSearch does not have its own crawlers.

If you’re not yet familiar with Norconex Collectors, head over to the Norconex Collectors website to see what you’ve been missing.
Assuming you’re already familiar with Norconex Collectors, you can enable CloudSearch as your crawler’s target search engine by following these steps:

  1. Download the CloudSearch Committer.
  2. Extract the zip, and copy the content of the “lib” folder to the “lib” folder of your existing Collector installation.
  3. Add this minimum required configuration snippet to your Collector configuration file:
    <committer class="com.norconex.committer.cloudsearch.CloudSearchCommitter">
      <serviceEndpoint>(CloudSearch service endpoint)</serviceEndpoint>
      <accessKey>
         (Optional CloudSearch access key. Will be taken from environment when blank.)
      </accessKey>
      <secretKey>
         (Optional CloudSearch secret key. Will be taken from environment when blank.)
      </secretKey>
    </committer>
  4. The document endpoint represents the CloudSearch domain you’ll want to use to store your crawled documents. It can be obtained from your CloudSearch domain’s main page.

CloudSearch main page

As for the AWS access and secret keys, they can also be stored outside the configuration file using one of the methods described here.
The complete list of configuration options is available here.

For further information: