This vulnerability impacts Log4J version 2.x, version 1.2 is not affected (source). Norconex HTTP Collector version 2.x use Log4J v1.2.17 and thus are not affected. Version 3 of the Collector uses Log4J v2.17.1, which Apache has patched.
Note: Unless you made it so on purpose, the HTTP Collector does not run as a service accessible from the internet.
When starting to play with the programming world, it doesn’t take long to notice the sheer amount of options. With so many options available, it’s easy to become overwhelmed by all the information. Sorting through it all is no easy task for the less tech-savvy among us. For that reason, Norconex has put a lot of effort into making its products more user-friendly. With the new Config Starter, everyone can now easily generate a basic configuration file for the Norconex HTTP Collector version 3.
The Norconex HTTP Collector Config Starter is a “wizard” that will generate the configuration file for you to run the Norconex HTTP Collector. Whether you don’t know anything about the world of programming or you just want to quickly set up your crawler, this Config Starter is made for you. In this article, we will go through each section of this wizard and show you how to start your crawler with it.
Collect section
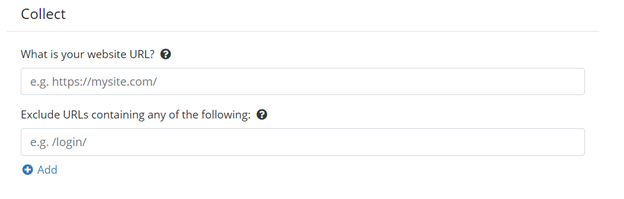
Collect section of the Config Starter
First, we have the Collect section. This section is important because it will collect all the documents from the webpage of your website. Here, you will provide the URL where the crawler collects the data that you need. The collector will start by downloading that page and then following all the links from that webpage. In this section, you can also, if applicable, enter any sections of your site that you do not want to crawl.
Import section
Import section of the Config Starter
Next, we have the import section. This is where you will choose what to keep from the information collected by the Collector. The first option here lets you remove the data collected from your website’s header, footer and nav sections. Those sections are generally used to navigate through a website and rarely contain any relevant information to crawl.
The second option lets you choose the fields that you want to extract from the data collected. This is useful if your goal is to extract specific data from your website, which will be sent to the committer. If you want to keep all the data, just leave this section empty.
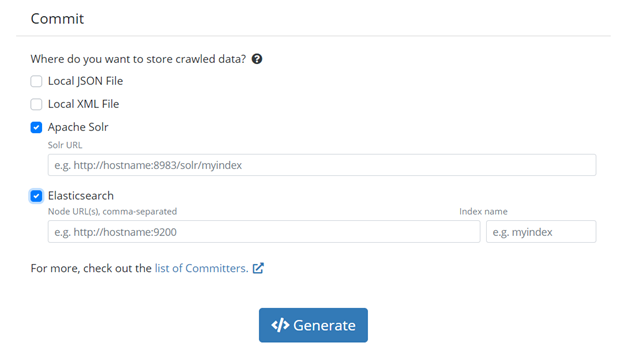
Commit section
Commit section of the Config Starter
Last, we have the Commit section. This section tells your crawler where to save the data you have collected. At the time of writing, we have four available committer options: Local JSON File, Local XML File, Apache Solr or Elasticsearch. If you select one of the last two, you will need to provide the localization of the committer.
If you want to manually configure any section of your configuration file, or use another committer, you can leave any section empty or easily edit it afterward.
When you are done, you can proceed to generate your configuration file; you should get something similar to the configuration below. This configuration comes with a detailed description for all the fields if you want to further customize your crawler later.
<?xml version="1.0" encoding="UTF-8"?>
<!--
_ _ ___ ____ ____ ___ _ _ _______ __
| \ | |/ _ \| _ \ / ___/ _ \| \ | | ____\ \/ /
| \| | | | | |_) | | | | | | \| | _| \ /
| |\ | |_| | _ <| |__| |_| | |\ | |___ / \
|_| \_|\___/|_| \_\\____\___/|_| \_|_____/_/\_\
===============================================
HTTP Collector Configuration File.
Generated by: https://opensource.norconex.com/collectors/http/v3/config/starter
Website: https://opensource.norconex.com/collectors/http/
Manual: https://opensource.norconex.com/docs/collectors/http/
-->
<httpcollector id="config-id">
<!--
Crawler "work" directory. This is where files downloaded or created as
part of crawling activities get stored.
It should be unique to each crawlers.
-->
<workDir>./work</workDir>
<crawlers>
<crawler id="crawler-id">
<!--
Mandatory starting URL(s) where crawling begins. If you put more
than one URL, they will be processed together. You can also
point to one or more URLs files (i.e., seed lists), or
point to a sitemap.xml.
-->
<startURLs stayOnDomain="true" stayOnPort="true" stayOnProtocol="true">
<url>https://mywebsite.com</url>
</startURLs>
<!-- Normalizes incoming URLs. -->
<urlNormalizer class="GenericURLNormalizer">
<normalizations>
removeFragment, lowerCaseSchemeHost, upperCaseEscapeSequence,
decodeUnreservedCharacters, removeDefaultPort,
encodeNonURICharacters
</normalizations>
</urlNormalizer>
<!--Handles interval between each page download-->
<delay default="3000" />
<!--
How many threads you want a crawler to use. Regardless of how many
thread you have running, the frequency of each URL being invoked
will remain dictated by the <delay/> option above. Using more
than one thread is a good idea to ensure the delay is respected
in case you run into single downloads taking more time than the
delay specified. Default is 2 threads.
-->
<numThreads>2</numThreads>
<!--
How many level deep can the crawler go. I.e, within how many clicks
away from the main page (start URL) each page can be to be considered.
Beyond the depth specified, pages are rejected.
The starting URLs all have a zero-depth. Default is -1 (unlimited)
-->
<maxDepth>10</maxDepth>
<!--
Crawler "work" directory. This is where files downloaded or created as
part of crawling activities (besides logs and progress) get stored.
It should be unique to each crawlers.
-->
<maxDocuments>-1</maxDocuments>
<!--
What to do with orphan documents. Orphans are valid
documents, which on subsequent crawls can no longer be reached when
running the crawler (e.g. there are no links pointing to that page
anymore). Available options are:
IGNORE, DELETE, and PROCESS (default).
-->
<orphansStrategy>PROCESS</orphansStrategy>
<!-- Handle robots.txt files. -->
<robotsTxt ignore="false" />
<!-- Detects and processes sitemap files. -->
<sitemapResolver ignore="false" />
<!--
Detects pages with a canonical link and rejects them in favor of
the canonical one.
-->
<canonicalLinkDetector ignore="false" />
<!--
Filter out matching URLs before they are downloaded. If you
want links extracted before a page gets rejected, it needs to be
rejected after it was downloaded. You can use <documentFilters>
instead to achieve this.
-->
<referenceFilters>
<filter class="RegexReferenceFilter" onMatch="exclude">.*/login/.*</filter>
</referenceFilters>
<!--
Import a document using Norconex Importer module. Here is your chance
to manipulate a document content and its metadata fields using
import handlers before it is sent to your target repository.
-->
<importer>
<!--
Pre-parse handlers take place BEFORE a document is converted to
plain-text. If you need to deal with the original document format
(HTML, XML, binary, etc.), define your import handlers here.
-->
<preParseHandlers>
<!-- Remove navigation elements from HTML pages. -->
<handler class="DOMDeleteTransformer">
<dom selector="header" />
<dom selector="footer" />
<dom selector="nav" />
<dom selector="noindex" />
</handler>
</preParseHandlers>
<!--
Post-parse handlers take place AFTER a document is converted to
plain-text. At this stage, content should be stripped of formatting
(e.g., HTML tags) and you should no longer encounter binary content.
-->
<postParseHandlers>
<!-- Rename extracted fields to what you want. -->
<handler class="RenameTagger">
<rename toField="title" onSet="replace">
<fieldMatcher method="csv">dc:title, og:title</fieldMatcher>
</rename>
</handler>
<!-- Make sure we are sending only one value per field. -->
<handler class="ForceSingleValueTagger" action="keepFirst">
<fieldMatcher method="csv">title</fieldMatcher>
</handler>
<!-- Keep only those fields and discard the rest. -->
<handler class="KeepOnlyTagger">
<fieldMatcher method="csv">title</fieldMatcher>
</handler>
</postParseHandlers>
</importer>
<!--
Commits a document to a data source of your choice.
This step calls the Committer module. The
committer is a different module with its own set of XML configuration
options. Please refer to committer for complete documentation.
Below is an example using the FileSystemCommitter.
-->
<committers>
<!--
JSON File Committer.
Store crawled documents to the local file system, in JSON Format.
Web site:
https://opensource.norconex.com/committers/core/
Configuration options and output format:
https://opensource.norconex.com/committers/core/v3/apidocs/com/norconex/committer/core3/fs/impl/JSONFileCommitter.html
-->
<committer class="JSONFileCommitter"/>
</committers>
</crawler>
</crawlers>
</httpcollector>
To start running your crawler, just refer to the location of the configuration file in the start command in the command-line console.
[Try] out the new Norconex HTTP Collector Config Starter.
[Learn] more about the inner workings of the Norconex HTTP Collector.
Norconex is proud to announce the 2.9.0 release of its HTTP and Filesystem crawlers. Keep reading for a few release highlights.
CMIS support
Norconex Filesystem Collector now supports Content Management Interoperability Services (CMIS). CMIS is an open standard for accessing content management systems (CMS) content. Extra information can be extracted, such as document ACL (Access Control List) for document-level security. It is now easier than ever to crawl your favorite CMS. CMIS is supported by Alfresco, Interwoven, Magnolia, SharePoint server, OpenCMS, OpenText Documentum, and more.
ACL from your CMS is not the only new type of ACL you can extract. This new Norconex Filesystem Collector release introduces support for obtaining local filesystem ACL. These new ACL types are in addition to the already existing support for CIFS/SMB ACL extraction (since 2.7.0).
Field discovery
You can’t always tell upfront what metadata your crawler will find. One way to discover your fields is to send them all to your Committer. This approach is not always possible nor desirable. You can now store to a local file all fields found by the crawler. Each field will be saved once, with sample values to give you a better idea of their nature.
The HTTP Collector adds a few new rules GenericURLNormalizer. Those are:
removeQueryString
lowerCase
lowerCasePath
lowerCaseQuery
lowerCaseQueryParameterNames
lowerCaseQueryParameterValues
Subdomains being part of a domain
When you configure your HTTP crawler to stay on the current site (stayOnDomain="true"), you can now tell it to consider sub-domains as being the same site (includeSubdomains="true").
Other changes
For a complete list of all additions and changes, refer to the following release notes:
The Norconex Collectors community keeps growing. We are thrilled to see the number of integrations grow with it as well. If you know of any Norconex Committer implementation out there, let us know and we’ll add them to the list!
This addition to Norconex Collector family should delight Google Cloud Search fans. They too can now enjoy the full-featured crawling capabilities offered by Norconex Open-Source crawlers.
Since this Committer is developed and maintained by Google, you will find installation and configuration documentation on the Google Developers website.
Norconex crawlers and Neo4j graph database are now a love match! Neo4j is arguably the most popular graph database out there. Use Norconex crawlers to harvest relationships from websites and filesystems and feed them to your favorite graph engine.
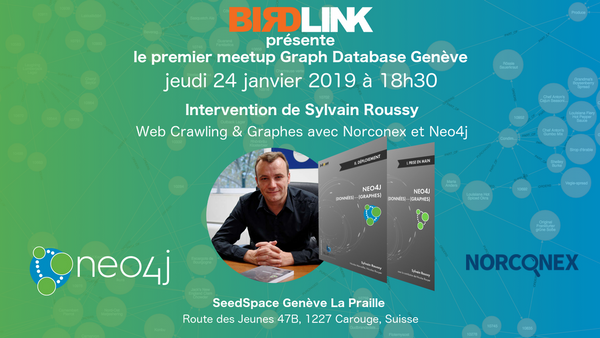
This was made possible thanks to no other than France contributor Sylvain Roussy, a Neo4j reference, and author of 2 Neo4j books. Norconex is proud to have been able to partner with Sylvain to develop a Neo4j Committer for use with its Norconex HTTP and Filesystem Collectors.
To our French-speaking European friends, Sylvain will host a series of Neo4j Meetups at different locations. He will explain how Norconex crawlers can be used to gather graph data from the web to use in Neo4j. The first of the series is taking place on January 24th, in Genève:
Norconex is proud to announce the release of Norconex HTTP Collector version 2.8.0. This release is accompanied by new releases of many related Norconex open-source products (Filesystem Collector, Importer, Committers, etc.), and together they bring dozens of new features and enhancements highlighted below.
Extract a “Featured Image” from web pages
[ezcol_1half]
In addition to taking screenshots of webpages, you can now extract the main image of a web page thanks to the new FeaturedImageProcessor. You can specify conditions to identify the image (first one encountered matching a minimum site or a given pattern). You also have the option to store the image on file or as a BASE64 string with the crawled document (after scaling it to your preferred dimensions) or simply store a reference to it.
The GenericLinkExtractor now makes it possible to only extract links to be followed found within one or more specific sections of a web page. For instance, you may want to only extract links found in navigation menus and not those found in content areas in case the links usually point to other sites you do not want to crawl.
[/ezcol_1half]
[ezcol_1half_end]
<extractor class="com.norconex.collector.http.url.impl.GenericLinkExtractor">

  <extractBetween>
    <start><![CDATA[<!-- BEGIN NAV LINKS -->]]></start>
    <end><![CDATA[<!-- END NAV LINKS -->]]></end>
  </extractBetween>

  <noExtractBetween>
    <start><![CDATA[<!-- BEGIN EXTERNAL SITES -->]]></start>
    <end><![CDATA[<!-- END EXTERNAL SITES -->]]></end>
  </noExtractBetween>

</extractor>
[/ezcol_1half_end]
Truncate long field values
[ezcol_1half]
The new TruncateTagger offers the ability to truncate long values and the option to replace the truncated portion with a hash to help preserve uniqueness when required. This is especially useful in preventing errors with search engines (or other repositories) and field length limitations.
Add metadata to a document using an external application
[ezcol_1half]
The new ExternalTagger allows you to point to an external (i.e., command-line) application to “decorate” a document with extra metadata information. Both the existing document content and metadata can be supplied to the external application. The application output can be in a specific format (json, xml, properties) or free-form combined with metadata extraction patterns you can configure. Either standard streams or files can be supplied as arguments to the external application. To transform the content using an external application instead, have a look at the ExternalTranformer, which has also been updated to support metadata.
Norconex released an SQL Committer for its open-source crawlers (Norconex Collectors). This enables you to store your crawled information into an SQL database of your choice.
To define an SQL database as your crawler’s target repository, follow these steps:
Add this minimalist configuration snippet to your Collector configuration file. It is using H2 database as an example only. Replace with your own settings:
Get familiar with additional Committer configuration options. For instance, while the above example will create a table and fields for you, you can also use an existing table, or provide the CREATE statement used to create a table.
Norconex just released a Microsoft Azure Search Committer for its open-source crawlers (Norconex Collectors). This empowers Azure Search users with full-featured file system and web crawlers.
If you have not yet discovered Norconex Collectors, head over to the Norconex Collectors website to see what you’ve been missing.
To enable Azure Search as your crawler’s target search engine, follow these steps:
You need to configure your index schema, the endpoint and index name from your Azure Search dashboard. You will also obtain the admin API key from Azure Search Service dashboard.
The complete list of Committer configuration options is available here. You will need to make sure the fields crawled match those you defined in your Azure Search index (can be achieved from your Collector configuration).
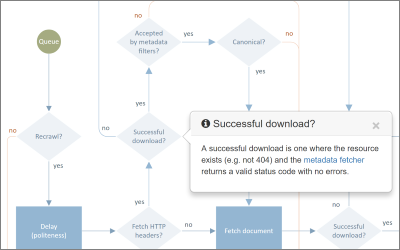
Norconex just made it easier to understand the inner-workings of its crawlers by creating clickable flow diagrams. Those diagrams are now available as part of both the Norconex HTTP Collector and Norconex Filesystem Collector websites.
Clicking on a shape will bring up relevant information and offer links to the corresponding documentation in the Collector configuration page.
While not all features are represented in those diagrams, there should be enough to improve your overall understanding and help you better configure your crawling solution.
This website uses cookies to improve your experience while you navigate through the website. Out of these, the cookies that are categorized as necessary are stored on your browser as they are essential for the working of basic functionalities of the website. We also use third-party cookies that help us analyze and understand how you use this website. These cookies will be stored in your browser only with your consent. You also have the option to opt-out of these cookies. But opting out of some of these cookies may affect your browsing experience.
Necessary cookies are absolutely essential for the website to function properly. This category only includes cookies that ensures basic functionalities and security features of the website. These cookies do not store any personal information.
Any cookies that may not be particularly necessary for the website to function and is used specifically to collect user personal data via analytics, ads, other embedded contents are termed as non-necessary cookies. It is mandatory to procure user consent prior to running these cookies on your website.

 Norconex is proud to announce the 2.9.0 release of its
 The
The  The new
  The new