Introduction
Docker is popular because it makes it easy to package and deliver programs. This article will show you how to run the Java-based, open-source crawler, Norconex HTTP Collector and Elasticsearch Committer in Docker to crawl a website and index its content into Elasticsearch. At the end of this article, you can find links to download the complete, fully functional files.
Overview
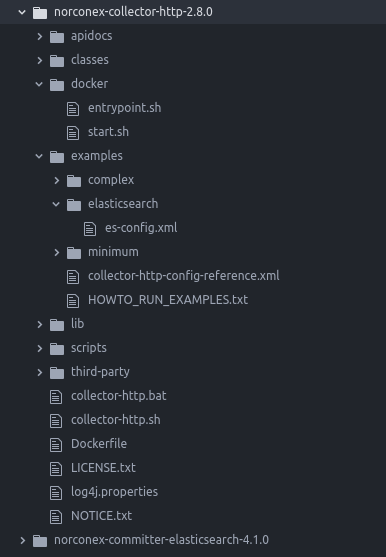
Here is the whole structure, which contains a “Dockerfile” to make a Docker image, “entrypoint.sh” and “start.sh” in “bin/” directory to configure and execute the Docker container, and “es-config.xml” in “examples/elasticsearch” as Norconex-Collector’s configuration file to crawl a website and index contents into Elasticsearch.
Installation
We are using Docker Community Edition in this tutorial. See Install Docker for more information.
Download the latest Norconex Collector and extract the downloaded .zip file. See Getting Started for more details.
Download the latest Norconex Elasticsearch Committer and install it. See Installation for more details.
Collector Configuration
Create “es-config.xml” in the “examples/elasticsearch” directory. In this tutorial, we will crawl /product/collector-http-test/complex1.php and /product/collector-http-test/complex2.php and index them to Elasticsearch, which is running on 127.0.0.1:9200, with an index named “norconex.” See Norconex Collector Configuration as a reference.
<?xml version="1.0" encoding="UTF-8"?>
<!--
   Copyright 2010-2017 Norconex Inc.

   Licensed under the Apache License, Version 2.0 (the "License");
   you may not use this file except in compliance with the License.
   You may obtain a copy of the License at

       http://www.apache.org/licenses/LICENSE-2.0

   Unless required by applicable law or agreed to in writing, software
   distributed under the License is distributed on an "AS IS" BASIS,
   WITHOUT WARRANTIES OR CONDITIONS OF ANY KIND, either express or implied.
   See the License for the specific language governing permissions and
   limitations under the License.
-->
<httpcollector id="Norconex Complex Collector">

  #set($http = "com.norconex.collector.http")
  #set($core = "com.norconex.collector.core")
  #set($urlNormalizer   = "${http}.url.impl.GenericURLNormalizer")
  #set($filterExtension = "${core}.filter.impl.ExtensionReferenceFilter")
  #set($filterRegexRef  = "${core}.filter.impl.RegexReferenceFilter")
  #set($committerClass = "com.norconex.committer.elasticsearch.ElasticsearchCommitter")
  #set($searchUrl = "http://127.0.0.1:9200")

  <progressDir>../crawlers/norconex/progress</progressDir>
  <logsDir>../crawlers/norconex/logs</logsDir>

  <crawlerDefaults>
    <referenceFilters>
      <filter class="$filterExtension" onMatch="exclude">jpg,gif,png,ico,css,js</filter>
    </referenceFilters>
    <urlNormalizer class="$urlNormalizer">
      <normalizations>
        removeFragment, lowerCaseSchemeHost, upperCaseEscapeSequence,
        decodeUnreservedCharacters, removeDefaultPort, encodeNonURICharacters,
        removeDotSegments
      </normalizations>
    </urlNormalizer>
    <maxDepth>0</maxDepth>
    <workDir>../crawlers/norconex/workDir</workDir>
    <!-- We know we don't want to crawl the entire site, so ignore sitemap. -->
    <sitemapResolverFactory ignore="true" />
  </crawlerDefaults>
  <crawlers>
    <crawler id="Norconex Complex Test Page 1">
      <startURLs>
        <url>/product/collector-http-test/complex1.php</url>
      </startURLs>
      <committer class="$committerClass">
    	  		<nodes>$searchUrl</nodes>
    	  		<indexName>norconex</indexName>
            <typeName>web</typeName>
    	  		<queueDir>../crawlers/norconex/committer-queue</queueDir>
    	  		<targetContentField>body</targetContentField>
    	  		<queueSize>100</queueSize>
  			<commitBatchSize>500</commitBatchSize>
   		</committer>
    </crawler>
    <crawler id="Norconex Complex Test Page 2">
      <startURLs>
        <url>/product/collector-http-test/complex2.php</url>
      </startURLs>
      <committer class="$committerClass">
    	  		<nodes>$searchUrl</nodes>
    	  		<indexName>norconex</indexName>
            <typeName>web</typeName>
    	  		<queueDir>../crawlers/norconex/committer-queue</queueDir>
    	  		<targetContentField>body</targetContentField>
    	  		<queueSize>100</queueSize>
  			<commitBatchSize>500</commitBatchSize>
   		</committer>
    </crawler>
  </crawlers>
</httpcollector>
Entrypoint and Start Scripts
Create a directory, “docker”, to store the configuration and execute scripts.
Entrypoint.sh:
#!/bin/sh
set -x
set -e

set -- /docker/crawler/docker/start.sh "$@"

exec "$@"
start.sh:
#!/bin/sh
set -x
set -e
${CRAWLER_HOME}/collector-http.sh -a start -c examples/elasticsearch/es-config.xml
Dockerfile
A Dockerfile is a simple text -file that contains a list of commands that the Docker client calls on while creating an image. Create a new file, “Dockerfile”, in the “norconex-collector-http-2.8.0” directory.
Let’s start with the base image “java:8-jdk” using FROM keyword.
FROM java:8-jdk
Set environment variables and create a user and group in the image. We’ll set DOCKER_HOME and CRAWLER_HOME environment variables and create the user and group, “crawler”.
ENV DOCKER_HOME /docker
ENV CRAWLER_HOME /docker/crawler
RUN groupadd crawler && useradd -g crawler crawler
The following commands will create DOCKER_HOME and CRAWLER_HOME directories in the container and copy the content from the “norconex-collector-http-2.8.0” directory into CRAWLER_HOME.
RUN mkdir -p ${DOCKER_HOME}
RUN mkdir -p ${CRAWLER_HOME}
COPY ./ ${CRAWLER_HOME}
The following commands change ownership and permissions for DOCKER_HOME, set entrypoint, and execute the crawler.
RUN chown -R crawler:crawler ${DOCKER_HOME} && chmod -R 755 ${DOCKER_HOME}
ENTRYPOINT [ "/docker/crawler/docker/entrypoint.sh" ]
CMD [ "/docker/crawler/docker/start.sh" ]
Almost There
Build a Docker image of Norconex Collector with the following command:
$ docker build -t norconex-collector:2.8.0 .
You will see this success message:
Successfully built 43298c7de13f
Successfully tagged norconex-collector:2.8.0
Start Elasticsearch for development with the following command (see Install Elasticsearch with Docker for more details):
$ docker run -p 9200:9200 -p 9300:9300 -e "discovery.type=single-node" docker.elastic.co/elasticsearch/elasticsearch:6.1.2
Start Norconex Collector.
$ docker run --net=host norconex-collector:2.8.0
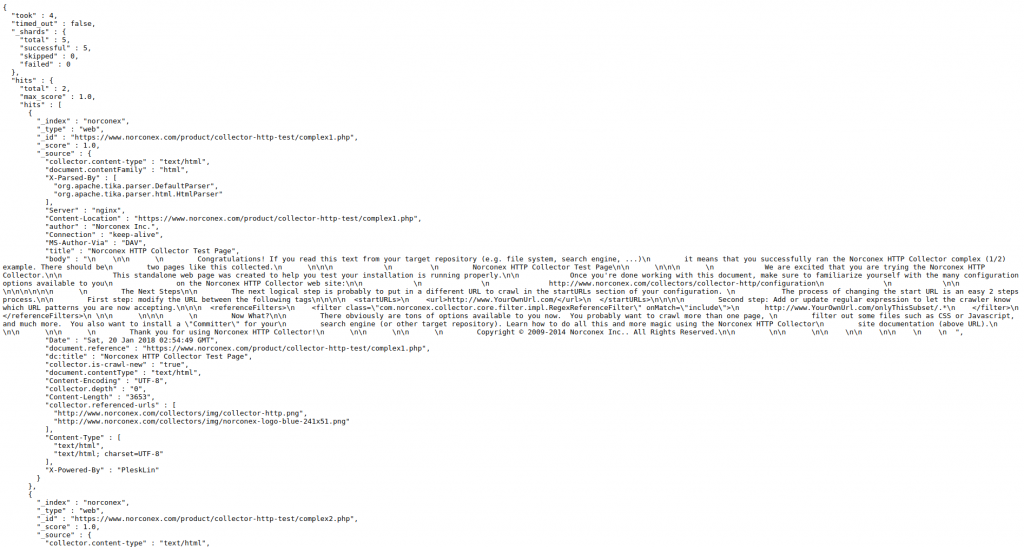
Let’s verify the crawling result. Visit http://127.0.0.1:9200/norconex/_search?pretty=true&q=* and you will see two indexed documents.
Conclusion
This tutorial is for development or testing use. If you would like to use it in a production environment, then we recommend that you consider the data persistence of Elasticsearch Docker container, security, and so forth, based on your particular case.
Useful Links
Download Norconex Collector
Download Norconex Elasticsearch Committer


