 Docker is all the rage at the moment! It was recently selected as Gartner Cool Vendor in DevOps. As you may already know, Docker is a platform to build and deploy applications as self-contained units. Those units, called containers, can be executed consistently on a developer laptop or production server. Since containers include all their dependencies, they are truly portable. And, compared to normal virtual machine images, Docker containers are much more lightweight because they don’t need as much infrastructure as a normal VM. Docker containers are built from an image, a simple text file describing the steps needed to assemble and execute the container. But the goal of this blog post is not to be a Docker tutorial. If you need it, there are plenty of good resources to get you started, like the Docker User Guide, this series of video tutorials recently published on their blog or the nice 10-minute tutorial where you can try Docker online. In this post, we will be using Docker 1.6.
We recently encountered a situation where we needed to use Solr 5 on a server already installed with Java 6. But Solr 5 requires at least Java 7. And, for different reasons, upgrading to Java 7 on this server was not an option. The solution? Run Solr 5 in a Docker container using the appropriate Java version! Containers are completely isolated, so this has no impact on the other applications running on the server.
It’s easy to build a Docker image for Solr 5. But, it’s even easier to use an already-existing image! Unfortunately, Docker does not offer an official Solr image (like it does for Elasticsearch). But the community has built multiple good-quality Solr images. We decided to use makuk66/docker-solr, which is actively maintained and has the options we needed. For example, this image has options to use SolrCloud. For this post, we will limit ourselves to using Solr cores.
First, you need to pull the image:
$ docker pull makuk66/docker-solr
Then, you can simply start a container with:
$ docker run -d -p 8983:8983 --name solr5 makuk66/docker-solr
You should be able to connect to Solr on port 8983.
But, as it is, you can’t add a core to this Solr installation. Solr requires the core files (solrconfig.xml, schema.xml, etc.) to be already on the server (in this case the container), which the makuk66/docker-solr does not provide. So we have to provide the core configuration files to the Docker container. The easy way to do so is to use Docker volumes, which link a directory on the host server to a directory of the Docker container. For example, let’s assume we create the necessary configuration files for the Solr core at ~/solr5/myindex on our server. This directory should contain a sub-directory conf with all the usual files, like solrconfig.xml and schema.xml. The myindex directory should also have a core.properties file with the content name=myindex.
$ cd ~/solr5/myindex
$ tree .
.
├── conf
│   ├── admin-extra.html
│   ├── admin-extra.menu-bottom.html
│   ├── admin-extra.menu-top.html
│   ├── _rest_managed.json
│   ├── schema.xml
│   └── solrconfig.xml
└── core.properties

1 directory, 7 files
Docker will need write access to the myindex directory (to create the data directory containing the Lucene index, for example). There are multiple ways to accomplish this, but here we simply change the group owner of the myindex directory to be docker and allow group members write access to the folder:
$ chgrp docker ~/solr5/myindex
$ chmod g+w ~/solr5/myindex
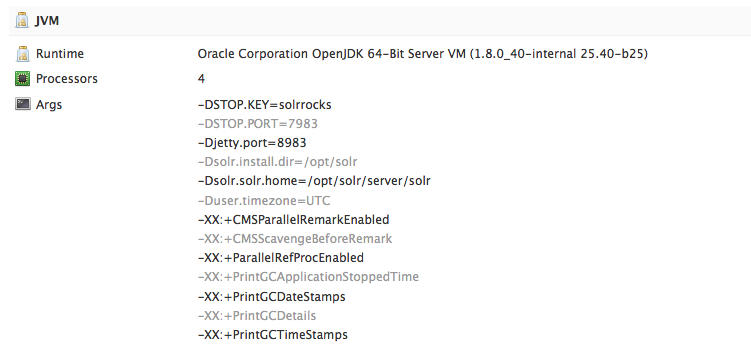
Now that the myindex directory is ready, we will need to link it so that it is available under the solr.home directory of the Docker container. What is the solr.home directory of the container? It’s easy to get this from Solr. When connecting to the Solr instance on port 8983, you should be redirected to the Solr dashboard. On this page, you should see the list of JVM parameters, and one of them is -Dsolr.solr.home

We can now remove the previous container:
$ docker rm -f solr5
and start a new one with a volume:
$ docker run -d -p 8983:8983 -v ~/solr5/myindex:/opt/solr/server/solr/myindex --name solr5 makuk66/docker-solr
Notice the -v parameter. It links the ~/solr5/myindex directory of the server to the /opt/solr/server/solr/myindex of the container. Every time Solr reads or writes data to the /opt/solr/server/solr/myindex directory, it will actually be accessing our ~/solr5/myindex directory. This is where Solr will create the data directory. Great, because Docker recommends that all files created by the container be held outside of the container. If you access the Solr instance on port 8983, you should now have the myindex core available.
The Docker container was started with basic JVM settings. What if we need to allocate more memory to Solr or other options? Docker allows us to override the default startup command defined in the image. For example, here is how we could start the container with more memory (don’t forget to remove the previous container):
$ docker run -d -p 8983:8983 -v ~/solr5/myindex:/opt/solr/server/solr/myindex --name solr5 makuk66/docker-solr "/bin/bash" "-c" "/opt/solr/bin/solr -m 1g -f"
To confirm that everything is fine with our Solr container, you can consult the logs generated by Solr with:
$ docker logs solr5
Conclusion
There is a lot more to be said about Docker and Solr 5, like how to use a specific Solr version or how to use SolrCloud. Hopefully this blog post was enough to get you started!


