When starting to play with the programming world, it doesn’t take long to notice the sheer amount of options. With so many options available, it’s easy to become overwhelmed by all the information. Sorting through it all is no easy task for the less tech-savvy among us. For that reason, Norconex has put a lot of effort into making its products more user-friendly. With the new Config Starter, everyone can now easily generate a basic configuration file for the Norconex HTTP Collector version 3.
The Norconex HTTP Collector Config Starter is a “wizard” that will generate the configuration file for you to run the Norconex HTTP Collector. Whether you don’t know anything about the world of programming or you just want to quickly set up your crawler, this Config Starter is made for you. In this article, we will go through each section of this wizard and show you how to start your crawler with it.
Collect section
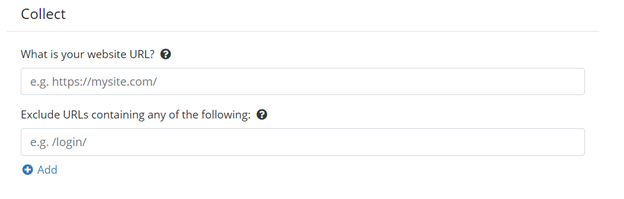
First, we have the Collect section. This section is important because it will collect all the documents from the webpage of your website. Here, you will provide the URL where the crawler collects the data that you need. The collector will start by downloading that page and then following all the links from that webpage. In this section, you can also, if applicable, enter any sections of your site that you do not want to crawl.
Import section

Next, we have the import section. This is where you will choose what to keep from the information collected by the Collector. The first option here lets you remove the data collected from your website’s header, footer and nav sections. Those sections are generally used to navigate through a website and rarely contain any relevant information to crawl.
The second option lets you choose the fields that you want to extract from the data collected. This is useful if your goal is to extract specific data from your website, which will be sent to the committer. If you want to keep all the data, just leave this section empty.
Commit section
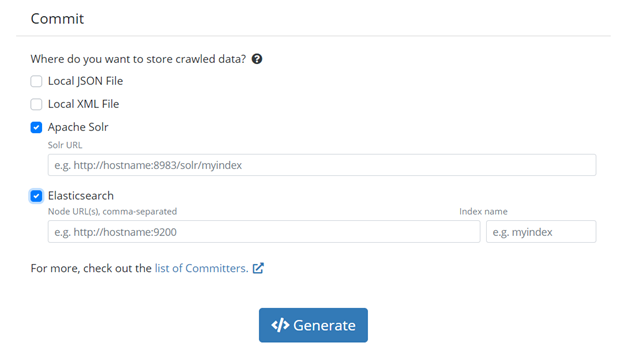
Last, we have the Commit section. This section tells your crawler where to save the data you have collected. At the time of writing, we have four available committer options: Local JSON File, Local XML File, Apache Solr or Elasticsearch. If you select one of the last two, you will need to provide the localization of the committer.
If you want to manually configure any section of your configuration file, or use another committer, you can leave any section empty or easily edit it afterward.
When you are done, you can proceed to generate your configuration file; you should get something similar to the configuration below. This configuration comes with a detailed description for all the fields if you want to further customize your crawler later.
<?xml version="1.0" encoding="UTF-8"?>
<!--
_ _ ___ ____ ____ ___ _ _ _______ __
| \ | |/ _ \| _ \ / ___/ _ \| \ | | ____\ \/ /
| \| | | | | |_) | | | | | | \| | _| \ /
| |\ | |_| | _ <| |__| |_| | |\ | |___ / \
|_| \_|\___/|_| \_\\____\___/|_| \_|_____/_/\_\
===============================================
HTTP Collector Configuration File.
Generated by: https://opensource.norconex.com/collectors/http/v3/config/starter
Website: https://opensource.norconex.com/collectors/http/
Manual: https://opensource.norconex.com/docs/collectors/http/
-->
<httpcollector id="config-id">
<!--
Crawler "work" directory. This is where files downloaded or created as
part of crawling activities get stored.
It should be unique to each crawlers.
-->
<workDir>./work</workDir>
<crawlers>
<crawler id="crawler-id">
<!--
Mandatory starting URL(s) where crawling begins. If you put more
than one URL, they will be processed together. You can also
point to one or more URLs files (i.e., seed lists), or
point to a sitemap.xml.
-->
<startURLs stayOnDomain="true" stayOnPort="true" stayOnProtocol="true">
<url>https://mywebsite.com</url>
</startURLs>
<!-- Normalizes incoming URLs. -->
<urlNormalizer class="GenericURLNormalizer">
<normalizations>
removeFragment, lowerCaseSchemeHost, upperCaseEscapeSequence,
decodeUnreservedCharacters, removeDefaultPort,
encodeNonURICharacters
</normalizations>
</urlNormalizer>
<!--Handles interval between each page download-->
<delay default="3000" />
<!--
How many threads you want a crawler to use. Regardless of how many
thread you have running, the frequency of each URL being invoked
will remain dictated by the <delay/> option above. Using more
than one thread is a good idea to ensure the delay is respected
in case you run into single downloads taking more time than the
delay specified. Default is 2 threads.
-->
<numThreads>2</numThreads>
<!--
How many level deep can the crawler go. I.e, within how many clicks
away from the main page (start URL) each page can be to be considered.
Beyond the depth specified, pages are rejected.
The starting URLs all have a zero-depth. Default is -1 (unlimited)
-->
<maxDepth>10</maxDepth>
<!--
Crawler "work" directory. This is where files downloaded or created as
part of crawling activities (besides logs and progress) get stored.
It should be unique to each crawlers.
-->
<maxDocuments>-1</maxDocuments>
<!--
What to do with orphan documents. Orphans are valid
documents, which on subsequent crawls can no longer be reached when
running the crawler (e.g. there are no links pointing to that page
anymore). Available options are:
IGNORE, DELETE, and PROCESS (default).
-->
<orphansStrategy>PROCESS</orphansStrategy>
<!-- Handle robots.txt files. -->
<robotsTxt ignore="false" />
<!-- Detects and processes sitemap files. -->
<sitemapResolver ignore="false" />
<!--
Detects pages with a canonical link and rejects them in favor of
the canonical one.
-->
<canonicalLinkDetector ignore="false" />
<!--
Filter out matching URLs before they are downloaded. If you
want links extracted before a page gets rejected, it needs to be
rejected after it was downloaded. You can use <documentFilters>
instead to achieve this.
-->
<referenceFilters>
<filter class="RegexReferenceFilter" onMatch="exclude">.*/login/.*</filter>
</referenceFilters>
<!--
Import a document using Norconex Importer module. Here is your chance
to manipulate a document content and its metadata fields using
import handlers before it is sent to your target repository.
-->
<importer>
<!--
Pre-parse handlers take place BEFORE a document is converted to
plain-text. If you need to deal with the original document format
(HTML, XML, binary, etc.), define your import handlers here.
-->
<preParseHandlers>
<!-- Remove navigation elements from HTML pages. -->
<handler class="DOMDeleteTransformer">
<dom selector="header" />
<dom selector="footer" />
<dom selector="nav" />
<dom selector="noindex" />
</handler>
</preParseHandlers>
<!--
Post-parse handlers take place AFTER a document is converted to
plain-text. At this stage, content should be stripped of formatting
(e.g., HTML tags) and you should no longer encounter binary content.
-->
<postParseHandlers>
<!-- Rename extracted fields to what you want. -->
<handler class="RenameTagger">
<rename toField="title" onSet="replace">
<fieldMatcher method="csv">dc:title, og:title</fieldMatcher>
</rename>
</handler>
<!-- Make sure we are sending only one value per field. -->
<handler class="ForceSingleValueTagger" action="keepFirst">
<fieldMatcher method="csv">title</fieldMatcher>
</handler>
<!-- Keep only those fields and discard the rest. -->
<handler class="KeepOnlyTagger">
<fieldMatcher method="csv">title</fieldMatcher>
</handler>
</postParseHandlers>
</importer>
<!--
Commits a document to a data source of your choice.
This step calls the Committer module. The
committer is a different module with its own set of XML configuration
options. Please refer to committer for complete documentation.
Below is an example using the FileSystemCommitter.
-->
<committers>
<!--
JSON File Committer.
Store crawled documents to the local file system, in JSON Format.
Web site:
https://opensource.norconex.com/committers/core/
Configuration options and output format:
https://opensource.norconex.com/committers/core/v3/apidocs/com/norconex/committer/core3/fs/impl/JSONFileCommitter.html
-->
<committer class="JSONFileCommitter"/>
</committers>
</crawler>
</crawlers>
</httpcollector>To start running your crawler, just refer to the location of the configuration file in the start command in the command-line console.
[Try] out the new Norconex HTTP Collector Config Starter.
[Download] and [get started] with the Norconex HTTP Collector.
[Learn] more about the inner workings of the Norconex HTTP Collector.
Samuel Dupuis
I am currently a Mechanical Engineering and Computer Science student at the University of Ottawa. I am fascinated by all technology related things, especially if it involves artificial intelligence and robotics.