Norconex released version 2.7.0 of both its HTTP Collector and Filesystem Collector. This update, along with related component updates, introduces several interesting features.
HTTP Collector changes
The following items are specific to the HTTP Collector. For changes applying to both the HTTP Collector and the Filesystem Collector, you can proceed to the “Generic changes” section.
Crawling of JavaScript-driven pages
[ezcol_1half]
 The alternative document fetcher PhantomJSDocumentFetcher now makes it possible to crawl web pages with JavaScript-generated content. This much awaited feature is now available thanks to integration with the open-source PhantomJS headless browser. As a bonus, you can also take screenshots of web pages you crawl.
[/ezcol_1half]
[ezcol_1half_end]
<documentFetcher
    class="com.norconex.collector.http.fetch.impl.PhantomJSDocumentFetcher">
  <exePath>/path/to/phantomjs.exe</exePath>
  <renderWaitTime>5000</renderWaitTime>
  <referencePattern>^.*\.html$</referencePattern>
</documentFetcher>
[/ezcol_1half_end]
More ways to extract links
[ezcol_1half]
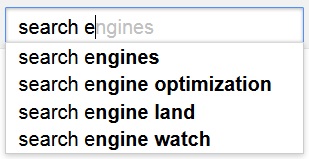
![]() This release introduces two new link extractors. You can now use the XMLFeedLinkExtractor to extract links from RSS or Atom feeds. For maximum flexibility, the RegexLinkExtractor can be used to extract links using regular expressions.
This release introduces two new link extractors. You can now use the XMLFeedLinkExtractor to extract links from RSS or Atom feeds. For maximum flexibility, the RegexLinkExtractor can be used to extract links using regular expressions.
[/ezcol_1half]
[ezcol_1half_end]
<extractor class="com.norconex.collector.http.url.impl.RegexLinkExtractor">
  <linkExtractionPatterns>
    <pattern group="1">\[(http.*?)\]</pattern>
  </linkExtractionPatterns>
</extractor>
<extractor class="com.norconex.collector.http.url.impl.XMLFeedLinkExtractor">
  <applyToReferencePattern>.*rss$</applyToReferencePattern>
</extractor>
[/ezcol_1half_end]
Generic changes
The following changes apply to both Filesystem and HTTP Collectors. Most of these changes come from an update to the Norconex Importer module (now also at version 2.7.0).
Much improved XML configuration validation
[ezcol_1half]
 You no longer have to hunt for a misconfiguration. Schema-based XML configuration validation was added and you will now get errors if you have a bad XML syntax for any configuration options. This validation can be trigged on command prompt with this new flag:
 -k or --checkcfg.
[/ezcol_1half]
[ezcol_1half_end]
# -k can be used on its own, but when combined with -a (like below),
# it will prevent the collector from executing if there are any errors.

collector-http.sh -a start -c examples/minimum/minimum-config.xml -k

# Error sample:
ERROR (XML) ReplaceTagger: cvc-attribute.3: The value 'asdf' of attribute 'regex' on element 'replace' is not valid with respect to its type, 'boolean'.
[/ezcol_1half_end]
Enter durations in human-readable format
[ezcol_1half]
 Having to convert a duration in milliseconds is not the most friendly. Anywhere in your XML configuration where a duration is expected, you can now use a human-readable representation (English only) as an alternative.
[/ezcol_1half]
[ezcol_1half_end]
<!-- Example using "5 seconds" and "1 second" as opposed to milliseconds -->
<delay class="com.norconex.collector.http.delay.impl.GenericDelayResolver"
    default="5 seconds" ignoreRobotsCrawlDelay="true" scope="site" >
  <schedule dayOfWeek="from Saturday to Sunday">1 second</schedule>
</delay>
[/ezcol_1half_end]
Lua scripting language
[ezcol_1half]
![]() Support for Lua scripting has been added to ScriptFilter, ScriptTagger, and ScriptTransformer. This gives you one more scripting option available out-of-the-box besides JavaScript/ECMAScript.
Support for Lua scripting has been added to ScriptFilter, ScriptTagger, and ScriptTransformer. This gives you one more scripting option available out-of-the-box besides JavaScript/ECMAScript.
[/ezcol_1half]
[ezcol_1half_end]
<!-- Add "apple" to a "fruit" metadata field: -->
<tagger class="com.norconex.importer.handler.tagger.impl.ScriptTagger"
    engineName="lua">
  <script><![CDATA[
    metadata:addString('fruit', {'apple'});
  ]]></script>
</tagger>
[/ezcol_1half_end]
Modify documents using an external application
[ezcol_1half]
 With the new ExternalTransformer, you can now use an external application to perform document transformation. This is an alternative to the existing ExternalParser, which was enhanced to provide the same environment variables and metadata extraction support as the ExternalTransformer.
[/ezcol_1half]
[ezcol_1half_end]
<transformer class="com.norconex.importer.handler.transformer.impl.ExternalTransformer">
  <command>/path/transform/app ${INPUT} ${OUTPUT}</command>
  <metadata>
    <match field="docnumber">DocNo:(\d+)</match>
  </metadata>
</transformer>
[/ezcol_1half_end]
Combine document fields
[ezcol_1half]
 The new MergeTagger can be used for combining multiple fields into one. The target field can be either multi-value or single-value separated with the character of your choice.
[/ezcol_1half]
[ezcol_1half_end]
<tagger class="com.norconex.importer.handler.tagger.impl.MergeTagger">
  <merge toField="title" deleteFromFields="true"
      singleValue="true" singleValueSeparator=",">
    <fromFields>title,dc.title,dc:title,doctitle</fromFields>
  </merge>
</tagger>
[/ezcol_1half_end]
New Committers
[ezcol_1half]
Whether you do not have a target repository (Solr, Elasticsearch, etc) ready at the time of crawling, or whether you are not using a repository at all, Norconex Collectors now ships with two file-based Committers for easy consumption by your own process: XMLFileCommitter and JSONFileCommitter. All available committers can be found here.
[/ezcol_1half]
[ezcol_1half_end]
<committer class="com.norconex.committer.core.impl.XMLFileCommitter">
 <directory>/path/my-xmls/</directory>
 <pretty>true</pretty>
 <docsPerFile>100</docsPerFile>
 <compress>false</compress>
 <splitAddDelete>false</splitAddDelete>
</committer>
[/ezcol_1half_end]
More
Several additional features or changes can be found in the latest Collector releases. Among them:
- New Importer RegexReferenceFilter for filtering documents based on matching references (e.g. URL).
- New SubstringTransformer for truncating content.
- New UUIDTagger for giving a unique id to each documents.
- CharacterCaseTagger now supports “swap” and “string” to swap character case and capitalize beginning of a string, respectively.
- ConstantTagger offers options when dealing with existing values: add to existing values, replace them, or do nothing.
- Components such as Importer, Committers, etc., are all easier to install thanks to new utility scripts.
- Document Access-Control-List (ACL) information is now extracted from SMB/CIFS file systems (Filesytem Collector).
- New ICollectorLifeCycleListener interface that can be added on the collector configuration to be notified and take action when the collector starts and stops.
- Added “removeTrailingHash” as a new GenericURLNormalizer option (HTTP Collector).
- New “detectContentType” and “detectCharset” options on GenericDocumentFetcher for ignoring the content type and character encoding obtained from the HTTP response headers and detect them instead (Filesytem Collector).
- Start URLs and start paths can now be dynamically created thanks to IStartURLsProvider and IStartPathsProvider (HTTP Collector and Filesystem Collector).
To get the complete list of changes, refer to the HTTP Collector release notes, Filesystem Collector release notes, or the release notes of dependent Norconex libraries such as: Importer release notes and Collector Core release notes.


 Norconex Committer and all is current concrete implementations (Solr, Elasticsearch, IDOL) have been upgraded and have seen a redesign of their web sites. Committers are libraries responsible for posting data to various repositories (typically search engines). They are in other products or projects, such as